Longe Line Logic |

|
In Part Four we discussed yielding, which is more of a forehand movement (turning over the haunches.) In this part we will discuss disengaging the hind end.
To disengage the horse, he has to execute a turn over the forehand. By this we mean that his lateral movement has to originate in his hind end. We are bending the horse, but we're mainly bending him from the back, where his "motor" is. We want the horse to redirect his forward drive to lateral drive, crossing one hind foot over the other. Once he does this he can no longer move forward. (Once he does this, the runaway rider no longer has a horse who is still rapidly moving with his head pulled to one side or the other!)
I will send him out and try this maneuver again, repeating the exercise in both directions. As we build up speed, I will give him some form of preparatory signal such as a gesture (e.g., step backward) or the verbal command "whoa" so as not to catch him off balance. I want him to disengage correctly each time at each level of intensity before we progress to the next level. Eventually I can longe him in a "bow tie" maneuver where he goes out to the end of the rope, I disengage him into a reverse, and he crosses in front of me in the opposite direction where I'll disengage him again to go back to the original direction. As the horse disengages more efficiently, I want to use less and less aid until I can simply take one step back and give just a slight bump on the rope to cause him to disengage. This drill is particularly important for horses that I suspect may want to kick me. If the horse gets "high," insolent or frustrated I can quickly disengage him and get that hind end away from me. If he takes another pass at me I can step back and put him into the bow tie drill. Thus I'm not yielding space if he gets aggressive nor am I allowing him to dominate me, but rather I redirect his energy into a series of moves which at the end of the 12 foot rope requires him to yield to my control. As the horse figures out the maneuver and disengages consistently I'll use less body motion and reshape my cue to include simply a slight tug on his nose and a gesture at his flank where I'd tap him with my leg to disengage when riding. A couple of years from now when I saddle up this horse for the first time, I want him to already have a sense as to what leg aids are. I'm too old to fuss with bucks and runaways, so if he gets excited or spooky, I want to be able to just tip his nose and tap him with my inside leg and have him think, "Oh, he wants me to disengage!"
Using this position allows me to help him out a little bit in case he gets confused or stuck. I can always reinforce my "artificial leg pressure" by tugging a little more on his nose to get his hind end to move away. As he begins to grasp the concept, I can tug less and encourage him to move primarily from my simulated leg aids. In the next part we will discuss an advanced maneuver, rope yields. Continue to Part SixReturn to Part FourImportant Note: If you take on the project of developing an untrained horse, everybody will want to give you advice. Don't act on any advice, including the ideas offered in this site, unless it makes sense to you and fits your individual situation. Your abilities and the sensitivities of your horse(s) may differ from the examples given. Be alert and rational with your actions so neither you nor your horse will get hurt. This information is offered as illustrations of what we do and the reader must apply common sense since he or she is solely responsible for his or her actions. Happy trails!Press "Back" to return to the page that brought you hereGo to Case Study SectionReturn to Training SectionReturn to Wild Horse MentorsReturn to KBR World of Wild Horses and BurrosGo To
|
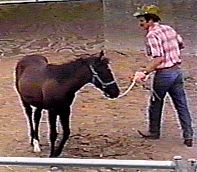 To teach the horse to disengage I will longe the horse at a relaxed walk. At some point when the horse is paying attention, I will take up the slack in the rope and step away from his head and shift slightly toward his hind end. This will draw his head to me and his hind end should swing away. I will start out easy, adjusting my "tug" so that he can step properly with his "near" hind leg crossing in front of his "far" hind leg. (Note the leg movements in this photo.)
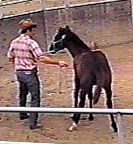 To reinforce this behavioral pattern, I will vary my disengagement cue. The horse has already shown me that he can disengage when I draw his head toward me, so this time I will just slightly tip the horse's nose and instead of just drawing his head around, I'll tap-tap-tap his flank until he disengages and steps away from me.